Sea knots. Main maritime knots Maritime knots and their purposes
When assembling a ship model, the modeler comes to the rigging and asks questions about securing the ropes with knots. Therefore, we will try to show them in detail in photographs and describe where and what they are used for. Each modeler independently selects methods of tying knots in accordance with his idea of the correspondence of their appearance to the real one.
It is known that rigging is divided into standing and running.
Standing rigging This is a cable rig, both ends of which are fixed in certain places and serve to fasten the fixed elements of the spar and transmit the thrust of the sails to the hull of the vessel. Once wound, the standing rigging always remains motionless.
Standing rigging includes:
Shrouds Standing rigging gear used to strengthen masts, topmasts and topmasts from the sides of a ship. The number of shrouds depends on the thickness of the mast and the area of the sails. Forduns Standing rigging rigging securing a topmast or topmast at the rear and sides. Forduns are designed to counteract the forward thrust of the forestays and give the topmasts and topmasts greater stability. Stays Standing rigging gear located in the centerline of the ship and supporting the mast, topmast and other spar in front or securing the bowsprit with the stem. Backstays Standing rigging rigging supporting from the sides and stern (except for the center plane) spars, bokants, davits, chimneys, etc. Perth Cables stretched under the yardarm at a distance of about 80 centimeters and secured at one end at its middle (behind the mast after the fastening strips), and the other - at the bow, as well as the jib- and boom-jib-rail Running rigging This is the cable equipment of the vessel (cables and chains used for lifting weights and various signals, raising, lowering and changing the direction of individual parts of the spar relative center plane of the vessel, cleaning and setting sails), secured at only one end. The second free end - the running end, or lapar - is usually passed through one or more blocks, clots, thimbles or deadeyes, forming a hoist, and then secured in the appropriate place. Running rigging performs work related to traction, hauling and pickling.
In turn, the running rigging is divided into running rigging of the spar and running rigging of the sails.
Root end The conventional name for the end of the cable that is fixed or not used in work, opposite the running end. Running end. It is also a lapar. The loose free end of the cable, which is used to begin movement when tying a knot.
Explanation of some terms that are used when describing rigging:
Benzel A special type of ligation made from a special thin cable for a tight connection of 2 parallel cables. Knop A braided locking knot at the end of a cable or tackle, made in a special way to strengthen it, and prevents slipping and development of the root end. One of the varieties of button is musing. Ogon A loop made at the end of a cable. Connecting brackets can be threaded through the lights when connecting two cables, etc.
There are several types of fire, including:
Simple fire A “temporary mark” is applied to the end of the cable, after which it is unraveled into strands, at the ends of which marks are also placed. Then it is laid in the form of a loop of the required dimensions, and each of the remaining strands is pierced under the corresponding strand of the unraveled part of the cable. Fire with a thimble It is performed in the same way as a simple fire, but a thimble is also intertwined with the cable. It protects the cable from sharp bends, increasing its service life. Cutting fire At the ends of two cables, strands are unraveled, each of them is marked. Then strands of one of the cables are woven into the other cable, and vice versa. At least three punches are performed. Horseshoe-shaped fire The cable is bent in the right place, and at some distance from the bend, strands of a small part of the cable of the same thickness are woven into both “branches”. Usually three punches are made. Dutch fire One of its strands is removed from the cable, and its length should be slightly greater than the length in the circle of the fire; two more strands of the cable are laid in the form of a loop so that their ends cross it. The free strand is inserted into its place towards the other strands. The ends of all strands are unraveled into heels and laid along the cable. Musing Stag-knock, pear-shaped, length 1/3 of the forestay loop, diameter - 3 times the forestay diameter. Stay stay A sling with a deadeye, which is attached to the bowsprit, is used to pull stays, water stays and water backstays. Stay-stay Loop of the forestay that encloses the top of the mast. Pendant A short cable with a thimble or block at the end. Sling A part of a rope tied around a pulley. Lopar A cable passing through a block pulley. Lanyard A device for tensioning ship's gear when fastening it. Hoist A device for lifting loads (spar). Vorst An iron rod tied to the shrouds along the top deadeyes in order to hold the deadeyes in the same plane. Splice A method of splicing two different synthetic, vegetable and steel cables by intertwining their constituent strands without breaking the cable. The resulting connection, when properly manufactured, has high strength.
And let us explain some of the terms that are used when describing maritime knots:
Loop (open) The running (or root) end of a cable, bent twice so that it does not cross itself. Peg (closed loop) - a loop made by the running or root end of the cable so that the cable crosses itself. Half-knot A single overlap of two different ends of the same cable or two ends of different cables. This is the first half of the straight or woman's knot. Encircling a cable around an object: a log, a pole, another cable, a ring, an eye, a bracket, a hook, etc., made so that both ends of the cable do not intersect. Brand Several cable hoses (the thinnest part of a plant cable) tightly placed one next to the other at the end of the cable to prevent it from unraveling. Hitch A full turn (360 degrees) of a rope around an object (a log, a pole, another cable, a ring, an eye, a bracket, a hook, etc.), made so that after this the end of the cable is directed in the opposite direction. Half-bayonet The carrying of a cable around an object (a log, a pole, another cable, a ring, an eye, a bracket, a hook, etc.) followed by the cable crossing its end at a right angle, without passing it into the resulting closed loop.
The most famous and frequently used maritime knots

Straight knot Used to connect two plant (non-metal) cables of the same small diameter. Under heavy load, subject to over-tightening. To avoid this, it is possible to insert wooden inserts into the hinges of the assembly.
You can knit in two ways:
- In the first method, we knit one half-knot using the running ends of the cables, and then another one in the opposite direction.
- In the second method, we pass the loop of the second through the loop of the first cable.


Reef knot It is knitted in the same way as a straight one, but one of the running ends, for quick release of the connected gear, is passed through a loop for the last time.


Straight half bayonet The final element for many knots, the simplest non-tightening knot. The running end is wrapped around the object, then around the root end and passed into the resulting loop. The running end must be fixed to the main end with a mark. Wet half-bayonet For fastening painters and mooring lines to bollards, poles and bits. Even when this unit is tightly tightened and wet, the possibility of its rapid return remains possible.


Straight bayonet Another classic sea knot is a non-tightening loop. In the navy, it is used for fastening ends during mooring, guying of slings, fastening pendants when lifting boats or cargo, etc. It is possible to temporarily connect two cables using two simple bayonets. The correct simple bayonet does not tighten when even very great force is applied and consists of two half-bayonets tied in one direction. When the hoses of this unit are moved towards each other, a whitewashed unit is obtained. A prerequisite: the remaining running end of the connected unit is securely fixed with a mark to the main one.
They are based on this node: 

Flat bayonet Connects two cables of different diameters

Retractable bayonet Used when tying a cable to a smooth spar, etc.; Bayonet with its own ends When tying two ends of one cable; Bayonet with two schlags Two schlags are placed on the eye, then knitted like a simple bayonet. Unlike a simple bayonet, it is used in cases where there is no need to quickly release the mooring lines, mainly for fastening cables and railings when mooring with bollards, bits and poles, and can be used to fasten the cable to a hook, eye, eye, etc. More reliable than a simple bayonet due to greater resistance to abrasion.


Fisherman's bayonet An anchor knot, knitted like a bayonet with two hoses, but the second hose, when carried around the eye, remains free (does not tighten) and the first half-bayonet is placed on both hoses. Can be used when tying an anchor cable to an anchor shackle.


Mast bayonet A loose knot around the transverse pole (mast, etc.) that is not tightened to the end; a simple bayonet is tied at the root end of the cable; the running end is fixed with a mark.


The builder's knot - pieces of resin cable - pieces that were attached transversely to the shrouds as steps for lifting sailors onto the masts - gave the name to this reliable knot. It is worth noting that its exceptional reliability is maintained only when the cable is tensioned at both ends. Attach the cable to the mast, yard or other transverse objects with a smooth surface is also convenient using a tapping unit.
This knot can be knitted in two ways, depending on the object to which we attach the cable:
- If one end of the object is open for access, we make two pegs on the cable, throw it over the object and tighten the knot.
- Otherwise, we encircle the object with the running end of the cable, cross this hose with the running end, encircle it again, bring the end under the same hose and tighten the knot. In fact, the knot consists of two half-bayonets, sequentially tied in one direction, with the strands brought closer together.


The bowline hitch is one of the most famous and used classic sea knots. Allows you to securely and quickly secure the cable around the body (under the arms) of a person for descent or ascent. A double bowline, in which a long running end is left, with which a second identical one is tied, was also used to secure a wooden platform (gazebo, hence the name) when performing work on masts, the hull of a ship, etc.
The knot is also used when attaching a rope to a hook or bollard temporarily, instead of a fire, since the loops of the bowline are not tightened on the plant cable, regardless of the magnitude of the load.
With certain dexterity, it is tied with one hand in 2-3 seconds: The running end is wrapped around the chest, holding it with the right hand, we place it on top of the molar, without letting go, we lead it down - towards you - up (a loop is formed on the wrist), without letting go, we draw the running end around the molar on the right, we intercept and pull our right hand out of the wrist loop without releasing the end of the cable.


Figure-eight knot - this classic knot is an excellent stopper at the end of the gear so that the latter does not slip out of the block pulley. Used to thicken the end of a cable, in the manufacture of handles for wooden buckets, etc. Easy to untie and does not weaken the cable. It forms the basis of many complex units for various purposes.
You can knit in two ways: With the first, we make a loop at the end of the cable into which we pass the running end, wrapped around the cable once (first method) or 2 times (second method).
Clew knot Used when tying sheets into the clew corners of sails. Also known as weaving, mesh, bucket. One of the oldest known knots. Reliable when the cable is taut. The running end of the cable (sheet) is passed into a loop (into the clew corner), wrapped around and passed under the main end.


Brass-sheet knot It is used for tying two cables of the same diameter during lifting operations, when towing boats, tying sheets into the corners of the patch when repairing damage to the underwater part of the hull, taking the brake-sheets and brass-sheets with the end of the fire when tying the brass-sheets into the brass - halyard and gintsev in the topenant of the lower yards.
The knot works only on a tensioned cable, however, the reliability of the main-clew knot is slightly higher than that of the clew. It is tied in the same way as a clew, but has not one, but two hoses around the loop (krengel). 

Deadeye knot An ancient knot used in the sailing fleet for tensioning shrouds using turnbuckles and deadeyes. This knot, even when tightly tightened, can be untied quite easily. Knitted in two ways: the first method is based on a straight knot, the second is based on a figure eight.


Flemish knot One of the oldest knots based on a figure eight, tied at two ends to connect two cables, a counter figure eight.
It is tied in two ways:
- at the first running end of one cable we knit a figure eight, then, from the exit side of the running end, we start the running end of the second cable and, moving parallel to the first cable, we knit the second figure eight. We tighten it carefully, trying to maintain the shape of the knot, first at the running ends, and then at the root ends;
- with the second method, we knit both cables, folded together, with their running ends facing each other, in a figure eight for about a meter segment. The inconvenience of this method is the need to pass the long root end along with the short running gear.


Gings knot For fastening the cable to the thimble. With the running end, we place two hoses on the neck of the thimble, cover it with the root end, and insert it into the thimble with a loop. We insert a wooden brake into the loop.


Stopping knot They stop the cables to which the thrust is applied.
I came across Safronenko’s brochure “Learning to Tie Knots.” It may be useful for others to read this material.
For orientation in the description of the nodes, they are used in accordance with Fig. 1, the following terms: root end - the end of the cable, fixedly fixed or used when tying a knot; opposite to the running end; running end - the loose free end of the cable, which begins movement when tying a knot; loop (open) - the running (or root) end of the cable, bent twice in such a way that it does not intersect with itself; pebble (closed loop) - a loop made by the running or root end of the cable so that the cable crosses itself; half-knot - a single overlap of two different ends of the same cable or two ends of different cables; carryover - a rope wrapping around an object (a log, a pole, another cable, a ring, etc.), made in such a way that both ends of the cable do not intersect; hose - a full turn (360°) of a rope around an object, made so that after this the end of the rope is directed in the opposite direction; half-bayonet - carrying around an object with a cable, followed by the cable crossing its end at a right angle, without passing it into the resulting closed loop.
 KNOTS FOR THICKENING THE ROPE “Simple knot” (Fig. 1). This is the simplest of all known knots. To tie it, you need to make a half-knot with the running end of the cable at its root end. It can be tied at the end or in the middle of the rope. To do this, the running end of the cable is carried once around its root part and passed into the resulting loop. Depending on how it is tied, a simple knot can be left (Fig. 2, a) or right (Fig. 2, b). . This is not only the simplest of all knots, but also the smallest in size. When the cable is pulled, it becomes so tight that it is sometimes very difficult to untie it. One more negative feature for plant cables should be taken into account - this knot, like no other, spoils the cable, as it bends it greatly and weakens its strength by about half. A simple knot is used to tie at the end of a thread so that it does not slip out of the fabric, to prevent the rope from unraveling, and also as an additional knot; for example, at the ends of sheets tied together to serve as a rope in a fire. A simple knot, despite its primitiveness and ability to tighten tightly, is an integral element of many useful knots. "Eight" (Fig. 2-2). This knot is considered a classic - it forms the basis of many other, more complex knots for various purposes. It can serve as an excellent stopper at the end of a thread, rope, or cable. Even with strong traction, unlike a simple knot, it does not damage the cable, and it can always be easily untied. In everyday life, the “eight” is widely used. It is very convenient for securing a cable passing through a hole in an object, for example, in the wooden handle of an outboard motor rope starter. Two “figure eights” can be used to securely attach the rope to a children’s sled. To prevent your hand from slipping off the end of the dog leash, you can use a figure eight. It also serves well for attaching strings to the pegs of violins, guitars, mandolins, balalaikas and other musical instruments. “Stevedoring knot” (Fig. 2-3). Like the figure eight, this knot is a stopper for cables passing through the hole. It is knitted like a figure eight, but with the only difference that the running end is inserted into the loop after it has been looped around the root end of the cable twice. When tightening this knot, you need to make sure that the hoses at the root end do not twist and slip into the loop. A tight stevedoring knot is easier to untie if you pull the loop that is closer to the root end. “Oyster knot” (Fig. 2-4). Due to its symmetry, this knot is successfully used by musicians to fasten strings on the pegs of a violin, mandolin and other musical instruments. In size, the tightened oyster knot is much larger than the “eight”, and therefore it is used in cases where the holes on the pegs for some reason are larger than needed for a particular string. This knot has one peculiarity of tying: it is tightened in two steps. First, tie a running simple knot (see Figure 8-52 below) and tighten it. Having passed the running end of the cable into the loop, tighten the knot again. If the oyster knot is tightened in one step, it will not form correctly. In Fig. 2, c shows a diagram of an oyster knot, indicating its symmetry. In this form, it can serve as a good decorative ornamental knot. "Ufer knot" (Fig. 2-5). This ancient sea knot can be tied in two ways. The first method (Fig. 2-5, a) is based on a simple knot and involves inserting the running end into the loop from below between the root and running ends and then passing it underneath. The second knitting method (Fig. 2-5, b) involves tying a figure eight and pulling both ends into its corresponding loops. The peculiarity of the knot is that it is relatively easy to untie, even if it is tightly tightened. "Multiple Eight" (Fig. 2-6). If there is a need to temporarily shorten the cable or exclude an unreliable part of its length from work (in case of fear that it will break), it is best to use the “multiple figure eight”, which can also serve as a convenient handle for both large and small object (cardboard box, bale, old suitcase). If you tie a “multiple figure of eight” in the middle of the rope of a children’s sled, you will get a very good handle, but it is better to fasten the free ends of the rope to the sled with a simple “figure of eight”. “Multiple Eight” is a convenient handle on the end of a dog leash. To make the knot even and tight, as you tie each full turn, tighten it and move it towards the previous one. If you later need to use the entire length of the cable, the “multiple figure eight” is easy to untie. No matter how tightly it is tightened, it will not damage the cable. The “fire escape” (Fig. 2-7) consists of a series of simple knots that are knitted very quickly one after another (20 knots can be tied in half a minute). It is magnificent in its simplicity and effectiveness, but requires a certain skill and precision in execution. Knitting this knot begins with the formation of a certain number of closed loops (pegs) wound behind each other. Take the running end of the cable in your left hand, stepping back 15-20 cm from its edge. Make the first pebble with a diameter of no more than 10 cm so that the root end of the cable is at the bottom. Then make the same pin and press the thumb of your left hand to the tips of the others. In exactly the same way, make 5-7 pegs, evenly laid one on top of the other. To prevent them from moving out and getting tangled, place them on the outstretched fingers (except the thumb) of your left hand. You will get a kind of rope “cup” ". Carefully remove it from your fingers so that it does not crumble or flatten. Now pass the running end, which you held in your left hand, inside this “cup” and bring it out on the other side. Place the “cup” on your left palm and clasp it on all sides with five fingers. With the curved fingertips of your right hand, hold the upper edge of the “cup” and slowly, without jerking, pull the running end of the cable sticking out of the “cup” upward. As you pull this running end on it simple knots will be tied. Their number will correspond to the number of pegs made, and the distance between them will correspond to the length of their circumference. Knots can be quickly tied by securing one end of the rope to the radiator, to the leg of the bed (chair), throw the other end out the window and, if necessary, go down down the rope. Such a “ladder” can help a person who has fallen overboard a ship. It is convenient for several people to pull out a car stuck in the mud. To make it easier to pull, tie a “fire escape” on the ground so that the knots go approximately every meter.
 TIGHTENING KNOTS “Self-tightening knot” (Fig. 4-18). This primitive knot is perhaps the most original. A force commensurate with the strength of the cable can be applied to the root part of this unit, and it will hold securely. The greater the thrust, the more strongly the free running end is pressed by the hose, and the knot tightens itself. But it is only reliable when tied around a log and constant force is applied to the root end. If the force is applied to the cable alternately, in jerks, then the running end may slip out from under the root end of the cable. A self-tightening knot can be used in cases where the suspended load is motionless and the direction of traction to the root end does not change. It is convenient for them to hang bags of food on the crossbar in warehouses to save them from rodents. By releasing the running end of the cable, the suspended bag can be smoothly lowered. “Self-tightening knot with half bayonet” (Fig. 4-19). By adding one or two half-pins to a self-tightening knot, we will get a more reliable knot that can be used for various needs. “Whiteout knot” (Fig. 4-20). This knot consists of two half-bayonets tied in the same direction. There are two ways to tie it. The first method is used in cases where one of the ends of the object around which the knot is knitted is open and accessible (Fig. 4-20, a), the second when the cable has to be carried directly around the object (Fig. 4-20, b) . Using a knot, you can attach a rope to a smooth post or crossbar, tie a bag, pull a rope between two posts, tie a string to a bow, moor a boat to a pile or stake dug on the shore, attach twine to a thick cable. It is very convenient for feeding a tool to a height (for example, a hammer). When weaving many types of fishing nets, bleached knots form the first row of knitting. However, when using a tapping knot, you should always remember that it is reliable only with a constant pull on the cable or rope. “Retractable bayonet” (Fig. 4-21). This unit is more advanced and more reliable than the bleached one. It can also be used in cases where the direction of pull of the cable is at an acute angle to the log or cable to which it is attached. The retractable bayonet holds even when the thrust is directed almost along the br?v-.^a. Unlike a tapping knot, a sliding bayonet has not two, but three hoses enclosing the object; one on one side of the root end and two on the other. When tying this knot, it is necessary to take into account which direction the pull behind the root will be directed end, and depending on this, tie a knot. It’s easy to remember: on which side is the pull, there are two hoses. When using a retractable bayonet, do not forget that it is reliable only under load and does not like sudden loosening. "Constrictor" (Fig. 4-22). Known throughout the world by this name, which means “boa constrictor” in Latin, the knot is one of the tightest knots around. At the same time, it is considered one of the most difficult knots to untie. As a rule, it is not even untied; it serves only once. The constrictor tightens well on round objects that do not have sharp corners; in this case it is irreplaceable. This is a very useful and important node. With its help, you can, for example, tie a bag very tightly, the valve of a soccer ball, compress a leaking rubber hose, tighten a carpet, a bag, a cotton blanket, tie the hands of a bully, apply a tourniquet to a wounded limb, and much more. . “Double constrictor” (Fig. 4-23). This knot is more complex than the previous one and tightens even more. "Python knot" (Fig. 4-24). It is similar in principle to a constrictor. It can be used, except in cases like a constrictor, and for connecting two transverse slats (Fig. 4-24, b). Their connection using this knot will be much stronger than with nails. They can be used to tie the wooden slats of a kite, and when constructing a wicker fence, tie one rope to another at a right angle. “Blind loop” (Fig. 4-25). This knot is also called a tag knot, as it is very convenient to use for tying keys together, for storing washers and other items that have a hole, and also for tightening the neck of a bag when tying it. "Stop Knot" (Fig. 4-26). Sometimes there is a need to hold a cable under tension. This is done with the help of another cable, attached with a stopper knot to the cable that needs to be held. If the pull of the cable that needs to be stopped is to the right, then the running end of the stop cable is placed on top of the cable with the hose to the left, then another hose is made and the running end of the stop cable is led towards the first and second hoses, into their clamp, and then to the right around wrap the cable around it, making one or two more hoses, and in two or three places they put strong grips or secure them “under themselves”. “Swing knot” (Fig. 4-27). If you decide to make a swing at your dacha or in the yard of your house, then don’t look for a better unit. “Noose with half bayonets” (Fig. 4-28). This knot, proven by centuries of experience at sea, has long been used on the shore. It is reliable and very strong, it tightens extremely tightly around the object, but when the pull on the cable stops, it is very easy and simple to untie it. The noose with half bayonets is widely used by lumberjacks. In many foreign languages it is called “forest knot” or “log knot”. To lift a heavy log or pipe, instead of special rigging devices, you can use a vegetable or steel cable of appropriate strength. But for this you need to know how to tie a knot correctly. It should always be knitted slightly away from the middle of the log (pipe). Having removed the running end of the cable from the loop that makes up the knot, it is pulled towards the end of the object being lifted, from which the pull will be, and two half-bayonets are made. But, as a rule, two half-bayonets are made before the start of tying the noose, since the root end of the tackle is already attached to the lifting mechanism. The slack of the cable between the noose and the half-bayonets must be selected before lifting. Having lifted an object with a crane, it is better to deliver it to its place in one step, without lowering it to the ground. You should always remember that this unit must be checked before each lift (if it is carried out in two steps). It is also important in which direction to make half-bayonets on the log. They should be laid along the descent of the cable. Lifting heavy objects with a noose without half bayonets is considered dangerous.
 NON-TIGHTENED KNOTS “Simple half bayonet” (Fig. 3-8). It is the simplest of the non-tightening knots and is widely used - it serves as the final element of many knots. A tied half-bayonet with a running end attached with a grip reliably withstands strong traction. He may move towards the object, but he will never be drawn in. “Simple bayonet” (Fig. 3-9). Two identical half-bayonets make up a knot, which is called a simple bayonet. This non-tightening knot is one of the simplest and most reliable knots for fastening. For a correctly tied bayonet, its running end, both after the first and after the second pegs, should extend equally above or below its end. For an inverted, that is, incorrectly tied bayonet, the running end after the second peg goes in the opposite direction, not the same as after the first. If the half bayonets of a simple bayonet are made in different directions, then when the cable is tensioned they will come together and the knot will be tightened. You should not throw more than three half-bayonets in such a knot, since this is quite enough and the strength of the knot as a whole will not increase with a larger number of half-bayonets. This simple but reliable unit can be used in all cases when the cable needs to be temporarily attached to an object for strong traction, for example, to a hook when towing a car. “Bed bayonet” (Fig. 3-10). This non-tightening knot holds securely even with strong pitching, and if necessary, it can be easily and quickly untied. “A simple bayonet with a hose” (Fig. 3-11). This knot differs from a simple bayonet by one additional hose around the object to which the cable is attached. Two hoses around the object make this knot more reliable under long-term loads - due to the additional hose, it will not fray as quickly as a simple bayonet. “A simple bayonet with two shlags” (Fig. 3-12). It differs from the previous knot by an additional, third hose, which increases the strength and reliability of the knot if the cable is under constant pressure. “Bayonet with drift” (Fig. 3-13). It is more symmetrical than a simple bayonet with two hooks, and in the event of a change in the direction of thrust, it moves less along the object to which it is tied. To tie a bayonet with a bow, you first need to make one hose around the object with the running end, wrap it around the back of the root end and make a hose again, but in the other direction. After this, you should make one or two half-bayonets. “Reverse bayonet” (Fig. 3-14). A situation often arises when the running end of the cable is enclosed around an object (logs, etc.) p.) very difficult. Using a reverse bayonet, you can loop the cable around the desired object once and at the same time tie a knot with two hoops around the object to which you are attaching the cable. To do this, the running end of the cable must be folded at a length of 2-3m in half and, looping it around the object, pull the loops towards you. Now the running end of the cable needs to be threaded into this loop, and the slack should be taken out at the root end and the knot should be finished with two half-bayonets. “Fisherman's bayonet” (“anchor knot”) (Fig. 3-15) Recognized by sailors of all countries as the most reliable for attaching a rope. It can be used in all cases when working with cables when they are subject to strong traction. "Mast bayonet" (Fig. 3-16). First, a bleached knot is tied around the object to which the cable is attached (see; Fig. 4-20) and a simple bayonet is made at the root end of the cable - a reliable and simple knot is obtained. To prevent the mast knot from becoming too tight, the first knot is not fully tightened. "Port node" (Fig. 3-17). First, near the bollard you need to make several hoses with the running end of the mooring cable. After this, fold the running end in half and in this form, in a loop, pass it under the tensioned root part of the cable, turn the loop 360° and throw it on top of the cabinet. This knot does not slip and holds securely. The cable can be released at any time, even if it is under strong tension. To do this, you need to slightly select the running end passing under the root end and enlarge the loop, after which it will not be difficult to throw it off the stand.
 KNOTS FOR LINKING TWO CABLES “Oak knot” (Fig. 5-29). Its positive qualities are the speed at which it can be tied and its reliability. It is used only in exceptional cases, when there is a need to very quickly connect two cables. When connecting plant cables, the connection has a significant drawback: a tightly tied knot is very difficult to untie later, especially if it gets wet. In addition, a cable tied with such a knot has less strength and during operation creates a danger of getting caught on something during its movement. To connect two cables, their ends need to be folded lengthwise together and, stepping back from the edges 15-20 cm, tie both ends as one whole with a simple knot. Do not try to tie synthetic cables and fishing line with this knot: it crawls on them. "Flemish Knot" (Fig. 5-30). This is one of the oldest maritime knots, which was used to connect two both thin and thick cables. In fact, this is the same figure eight, tied at both ends. First, make a figure eight at the end of one of the cables being tied (see Figure 2-2). Insert the running end of the second cable towards the exit of the running end and repeat the figure eight tied to the first cable. After this, grab each end on the left and right and begin to tighten the knot evenly, trying to maintain its shape. To final tighten the knot, pull the root ends of the cables. There is a second way of knitting: we tie a figure eight with cables folded over a length of approximately one meter, but in this case you will have to carry it around and thread it into the loop along with the short running end of one of the cables and the long main one - this is the inconvenience second knitting method. The connection of two cables with a Flemish knot is considered very strong. This knot, even when tightly tightened, does not damage the cable, and it is relatively easy to untie. In addition, it has excellent quality - it does not slip and holds securely on a synthetic fishing line. "Flat knot" (Fig. 5-31). This knot has long been considered one of the most reliable knots for tying cables of different thicknesses. Having eight weaves, the flat knot never tightens too much, does not creep or spoil the cable, since it does not have sharp bends, and the load on the cables is distributed evenly over the knot. After removing the load on the cable, this knot is easy to untie. Its important advantage is that it is really flat. There are two ways to knit this knot: an untightened knot with its free running ends tacked to the main or half-pins at their ends (Fig. 5-31, a) and without such a tack, when the knot is tightened (Fig. 5-31, b). A flat knot tied in the first way (in this form it is called a “Josephine knot”) on two cables of different thicknesses almost does not change its shape even with very high traction and is easily untied when the load is removed. The second knitting method is used for tying thinner cables, with the same or almost the same thickness. In this case, it is recommended to first tighten the tied flat knot with your hands so that it does not twist during a sharp pull. After this, when a load is applied to the connected cable, the knot creeps and twists for some time, but when it stops, it holds firmly. It unties without much effort by shifting the loops covering the root ends. Since a flat knot has eight intersections, it can be tied in different ways—there are 256 different options for tying it. But not every knot from this number, tied according to the principle of a flat knot (alternating intersection of opposite ends “under and above”), will hold securely. Ninety percent of them are unreliable, and some are even dangerous for tying ropes intended for heavy pulling. Its principle depends on changing the sequence of intersection of connected cables in a flat knot, and it is enough to change this order a little, and the knot acquires other negative qualities. In Fig. 5-31 shows a knitting pattern that has been tested and tested in practice. Before you use this knot for a responsible task, you must first remember its diagram exactly and connect the cables exactly according to it without any even the most insignificant changes. Only in this case will the flat knot serve you faithfully and not let you down, “Hunting Knot” (Fig. 5-32). This new knot was invented by the retired English doctor Edward Hunter (translated from English as “hunter”), and the author’s receipt of a patent for the invention in 1979 caused a sensation in maritime circles in many countries. Essentially, a hunting knot is a successful interweaving of two simple knots tied at the ends of the cables. It holds perfectly on all cables, including the thinnest synthetic fishing lines. “Brasstail knot” (Fig. 5-33). This knot is also reliable for connecting two cables of different thicknesses, both vegetable and synthetic. Its reliability also lies in the fact that it does not immediately untie when the pull on the cable stops. "Furrier's knot" (Fig. 5-34). This wonderful knot is relatively simple, compact, has enough intersections to ensure strong tightening, and can be untied without much difficulty. It can be successfully used for tying synthetic cables and fishing lines. There are two ways to knit it. "Surgical knot" (Fig. 5-35). This unit is still used by doctors today. First, two half-knots are made one after the other with two ends, which are then pulled in different directions. Then another half-knot is tied on top, but in the other direction. The principle of the knot is that the first two half-knots do not allow the two ends to move in different directions while another half-knot is knitted on top. This knot is convenient to use when there is a need to pull and tie some elastic bale or burden with a rope and tighten the first half of the knot on the rope, which, without letting go of its ends with your hands, you have to press with your knee. "Academic node" (Fig. 5-36). This knot is similar to the surgical one, differing only in that instead of one second half-knot, it has two of them. It differs from its ancestor - the straight knot (see Fig. 6-39) in that the running end of the cable is wrapped around the running end of another cable twice, after which the running ends are led towards each other and again wrapped around them twice, that is, at the bottom two half-knots and two half-knots on top, but tied in the opposite direction. This gives it the advantage that when there is a large load on the cable, it is not as tight as a straight knot and is easier to untie. "Dagger knot" (Fig. 5-37). This knot is considered one of the best knots for tying two large diameter plant cables. It is not very complicated in its design and is very compact. It is most convenient to tie it if you first lay the running end of the cable in the form of the number “8” on top of the main one. After this, thread the extended running end of the second cable into the loops, pass it under the middle intersection of the figure eight and bring it above the second intersection of the first cable. Next, the running end of the second cable must be passed under the root end of the first cable and inserted into the figure-of-eight loop. When the knot is tightened, the two running ends of both cables stick out in different directions. The knot is easy to untie if you loosen one of the outer loops. "Weaving knot" (Fig. 5-38). This knot embodies the simplicity, reliability and compactness of instant thread tying. "Straight knot" (Fig. 6-39). Apparently, only in our country there is an unreasonably respectful attitude towards this unit. Sailors from other countries treat him more soberly and even with prejudice. After all, it cannot be used to connect two cables that will be subject to strong traction: it crawls and is dangerous when it gets wet. This node has claimed more human lives than a dozen other nodes combined. Unfortunately, many of the compilers of various manuals and manuals for riggers, builders, firefighters, rock climbers and mountain rescuers still recommend a straight knot for connecting two cables. But it can be sufficiently reliable only if its running ends are attached to the main ones. This knot is good for packing things, packages, etc. A straight knot consists of two half-knots, sequentially tied one above the other in different directions. This is the usual, simplest way to knit it (Fig. 6-39, a). Sailors, who have been using this knot since ancient times to tie cables, use a different tying method (Fig. 6-39, b). Weavers who use a straight knot to tie up broken threads of yarn tie it in their own, special way, convenient for them (Fig. 6-39, c). This knot, which, according to the unanimously accepted characteristic of our specialists, “is so tightened that it cannot be untied and will have to be cut,” turns out, even when wet and tightly tightened, it can be untied very simply, in 1-2 seconds. Take the root end A (Fig. 6-39, d) in your left hand and, so that it does not slip out of your hand, make a couple of slings around your palm. Also take running end B in your right hand. Pull the ends sharply and firmly in different directions. Without releasing end A from your left hand, clench the remaining part of the knot into your fist with your right hand, holding it with your thumb and forefinger. Pull the root end A to the left and the knot will come undone. The whole secret is that when you jerk ends A and B in different directions, the straight knot turns into two half-bayonets and completely loses its properties. It can also be easily untied if you take the root end G in your right hand and strongly pull the running end B to the left. Only in this case, the end of G then needs to be pulled to the right, and the rest of the knot (half bayonets) - to the left. When untying a straight knot in this way, remember that if you pull the running end to the right, then pull the main end to the left, and vice versa. When untying a straight knot, one should not forget that with the same force it was tightened, one of its running ends must be pulled with the same force. Even a wet straight knot, tied on the thickest plant cable, which is under strong traction, can always be untied by taking one of the running ends onto a capstan or winch. In any case, there is no need to cut the cable. There are three dangerous knots, very similar to the straight knot: “woman’s” (Fig. 6-40), “mother-in-law” (Fig. 6-41) and thief (Fig. 6-42). The primitive “woman’s” knot, unfortunately, has become firmly entrenched in our everyday life, and most people, having learned this knot in childhood, believe so strongly in its utility that they don’t even want to hear about any other knots. However, this traitor node has caused a lot of troubles throughout the history of mankind and even claimed many human lives. The “baby” knot consists of two half-knots, tied sequentially one above the other in the same direction. If you tie two ropes with it and pull, you can immediately see that the knot begins to move along the rope and slide along it. And if you tie it close to one of the ends of the rope being tied, then it can slip when pulled. But, oddly enough, sailors and fishermen of some countries use the woman’s knot in their work. In addition to its negative qualities (sliding and not being untied), they caught one of its positive qualities: under certain conditions, it instantly turns into a simple bayonet (see Fig. 3-9) - one of the simplest and most reliable ¬nyh sea knots for securing the mooring vessel on the shore with a pole, bollard or mooring bollard, without leaving the vessel ashore. And this is done with the help of the “woman’s” knot, despised by sailors. To do this, a loop is made at the end of the cable, which is intended to be brought ashore for fastening it with a simple bayonet around the stand, and the running end is connected to the root end with a “woman’s” knot, which is not fully tightened. From the side of the ship, this loop is thrown onto the pedestal and by jerking the main part of the mooring line, the “woman’s” knot turns into a simple bayonet. Some people, tying two ropes together, somehow manage to tie a so-called “mother-in-law’s” knot (Fig. 6-41), somewhat reminiscent of a “woman’s” knot (Fig. 6-40). If in the latter the running ends come out of the knot on one side, then in the “mother-in-law” knot they come out from different sides diagonally. The “mother-in-law” knot is just as insidious as the “woman’s” knot (if not more). It should not be used under any circumstances. "Thief's Knot" (Fig. 6-42). At first glance, it is almost no different from the straight knot (see Fig. 6-39) and it seems that it is akin to it. But if you look closely, it becomes clear that the running ends of the thief’s knot come out of it diagonally. The thief's knot, like the "woman's" and "mother-in-law's" knots, are shown for clarity in order to emphasize their similarities and differences with the straight knot. It is not recommended to use these four knots, as they are unreliable for connecting two cables.
 NON-TIGHTENED LOOP “Oak loop” (Fig. 7-43). This is the simplest loop of all existing non-tightened loops. It is knitted with a simple knot at the end of a cable folded in half (hereinafter in the diagrams, a circle indicates a working loop). The oak loop is strong. and is safe; unlike an oak knot, it can be used on a synthetic cable. However, an oak loop weakens the cable, bending it; it is tightly tightened, and it is very difficult to untie it. "Veinal loop" (Fig. 7-44). If, when tying an oak loop, you make an additional hose with the running end folded in half, you will get a loop that will be a little easier to untie. It is used for thin fishing lines. "Flemish loop" (Fig. 7-45). Knitted in a figure eight on a double-folded cable, it is a strong and easily untied loop at the end of the cable. The Flemish loop is suitable for tying on both thick and thin cables. It almost does not weaken the strength of the cable. Used for fastening strings of musical instruments and other purposes. “Perfect loop” (Fig. 7-46). The knot with which this fixed loop is tied at the end of the cable is simple, reliable and does not slip even on the thinnest synthetic fishing line. The perfect loop is very popular abroad among fishermen. "Gazebo knot" (Fig. 7-47). The second name for this knot is the “bowline knot”, or “bowline”. This is one of the oldest and most amazing knots ever invented by man. It is often referred to as the "King of Knots"; Not every sea knot can compare with it in the number of positive properties it possesses. It is surprisingly easy to knit, even with strong traction it never tightens “tightly”, does not spoil the cable, never slides along the cable, does not unravel itself and is easily untied when needed. In appearance, it is similar to a weaving knot, but its running end does not go into the loop of the other end, but into the loop of its root end. The gazebo knot, despite its amazing compactness, simultaneously contains elements of a simple knot, half-bayonet, weaving and straight knot. The elements of all these knots in a certain combination give the gazebo knot the right to be called universal. The main purpose of the gazebo knot is to tie a cable around a person’s armpits when ascending to a height or when lowering. You can insert a gazebo into the non-tightening loop of this unit (a small wooden platform board used to lift a person onto the mast or lower him over the side of the vessel during painting or other work). This knot can be successfully used to connect two cables of both the same and different diameters or cables made of different materials (a connection using two gazebo knots with loops of two cables made of different materials will be the most reliable). In addition, you can make a reliable tightening loop from a gazebo knot (see below, “Running bowline”). The gazebo knot can also be safely used to temporarily shorten the cable or in cases where it is necessary to eliminate a worn-out piece of cable from work by tying the knot so that this piece fits the loop. There are many ways to tie a bow knot. In Fig. 7-47 presents the most rational and simplest method. In life, the ability to quickly tie a bow knot around your waist can always come in handy. You need to be able to do this with one hand, with one continuous movement of the hand, in the dark, in 2-3 seconds. It is not at all difficult to learn this, just do it several times in a row. To untie the gazebo knot, it is enough to slightly move the loop of the running end along the weakened root part of the cable. Double gazebo knot (Fig. 7-48). This knot, which has two non-tightening loops, is used instead of a gazebo to lift a person to a height, to raise or lower a person who has lost consciousness, and in other cases. When tying a knot, one of the loops is made almost half the size of the other. A person sits in one loop, the second loop clasps his torso under the armpits. This allows him, having risen to a height, to work with both hands. There are several ways to tie a double bower knot. Let's consider the simplest one. The knot is tied with a rope folded in half. After inserting the running end (in the form of a loop) into the small loop of the knot, it needs to be pulled out a little and, wrapped around the large loop, placed in the upper part of the knot. Holding the main part of the cable, with the other hand pull down the right side of the large double loop. After this, the knot will be tightened and ready for use. The top knot (Fig. 7-49) can be used for fastening temporary guy wires when installing masts, driving piles, and planting seedling trees. If you have a jug whose neck has a more or less large protrusion, you can use a top knot to make a comfortable handle for it. To carry watermelons and large melons, it is best to use this knot, because once upon a time it was used on warships to carry cannonballs. A piece of any cable 2 meters long makes a reliable basket for the largest watermelon. In this case, the knot should not be fully tightened, but its three loops should be tied with two free ends. Of the known methods of tying a top knot, the one shown in the diagram is considered the best. Boatswain's, or "Spanish gazebo" knot (Fig. 7-50). It, like the double gazebo, serves to lift a person up or lower him from a height. A foot is inserted into each of the two loops of the boatswain's knot and the rope is held with one hand. This knot can be used to lift (or lower from a height) an unconscious person. To prevent it from falling out of the two loops, one or two half-bayonets are additionally tied on its chest with the running end of the cable. Burlatskaya loop (Fig. 7-51). It is also called a harness loop, or a Pushkar knot. This loop can be made either at the end of the cable or at any part of it. The loop is designed to apply traction in any direction. It is easy to tie and holds securely, but before a load is applied to the loop, it should be tightened firmly with your hands, since with a sharp pull it tends to turn over and slide along the cable for some time. Several loops tied in this way will help pull out a car stuck in the mud, allow you to climb to a height or descend from a steep cliff.

 TIGHTENING LOOPES Running simple knot (Fig. 8-52). This is the simplest knot that forms a tightening loop. When pulling on the root end, the loop is tightened, but it can be increased in size by pulling the running end away from the loop. The knot can be tied in any part of the rope. With its help, you can tighten a bag, tie a bale, attach a cable to something, moor a boat to a pile. Sliding figure eight (Fig. 8-53). Based on the figure-eight principle, this knot belongs to the category of reliable, tightly tightened loops. It has the property of being tightened smoothly and evenly when pulled at the root end. ".- ." ...: ..; . Silk knot (Fig. 8-54). This knot is borrowed from the simple technique of bird catchers. Snares made from horse hair or the thinnest fishing line work flawlessly with the help of such a knot. The snare knot is considered one of the smoothest and easiest knots to tighten. Running bowline (Fig. 8-55). This is the same arbor knot with a small loop into which the root end is passed. It is based on the lasso principle. The running bowline works flawlessly. It is used to catch floating logs and driftwood; it is used to search for and raise anchors left at the bottom. Tightening noose (Fig. 8-56). This knot is also called the “scaffold” or “gallows” knot. It also finds other uses: it is used to temporarily attach a cable to objects floating in the water or to throw and secure a cable to an object. This knot has an advantage even over such a good knot as a noose with half bayonets, in that the running end of the cable cannot slip out of the loop, and therefore a tightening noose is considered more reliable. To tie this knot, the cable is laid in the form of two loops of equal size. Both loops are surrounded several times with the running end of the cable, after which this end is passed into the loop facing the root part of the cable, and, while pulling out the outermost loop, it is clamped in it. A tightening noose can always be easily untied if you pull the root part cable This gloomy unit can also be used to store rope in a compact coil or as a weight at the throwing end to feed it. If you find it insufficient as a weight at the throwing end, then lower it into the water before use. The “drunk” knot (Fig. 8-57) has two tightening loops. When the running and root ends are pulled simultaneously, the loops are tightened. The knot apparently got its name because it was used to pacify excessively riotous people by putting loops on the wrists behind the back and tying the ends on the chest.
 QUICK-RELEASE KNOTS Figure 8 untie (Fig. 9-58). If an ordinary figure eight (see Fig. 2-2) is made with a loop, that is, the running end folded in half is passed into its last loop, then we will get a quick-release stopper. An untied running simple knot (Fig. 9-59). A running simple knot (see Fig. 8-52) can easily be turned into a quick-release knot without changing its function, i.e., using it as a tightening loop, and not as a quick-release knot. To do this, you need to insert the running end, folded in half, into its loop. In this case, it will have two properties at once: it will tighten and quickly untie if you pull the running end sticking out of the loop. This is a very common knot. All over the world they are used to tie horses by the bridle to a leash. To prevent the knot from accidentally coming undone, the end of the bridle is inserted into the loop (Fig. 9-59, b). With the help of a simple knot that can be untied, you can moor the boat behind a shore pile or pedestal in such a way that, if necessary, the cable can be released without leaving the boat by pulling the running end, which is left long enough. The Kalmyk knot (Fig. 9-60) is one of the most practical and reliable knots. The origin of the knot is clear from the name. And, although the Kalmyk steppes do not evoke associations with the sea and ships, it has long been used in the navy. Foreign sailors do not know him; he is not mentioned in foreign manuals. This beautiful knot is knitted almost instantly as follows. Place the running end of the cable behind the object and take it, stepping back a little from the end, from above with your left hand with your thumb towards you. With your right hand, place the main end over your left fist, in which the running end is already clamped, and make a full turn around it with the main part of the cable. Then, with the movement of your left hand, move the root end under the root part of the large loop while simultaneously carrying the running end around the same part of the cable and then intercepting the running end with the fingers of your left hand. After this, carefully pull the running end in the form of a loop through the main end hose located on the left hand (by dropping the hose), so that the running end does not straighten, and tighten the knot with the main end. The Kalmyk knot holds securely and quickly unties if you pull the running end. It is used for temporary fastening of the casting end to the mooring line (ring) when delivering the latter from the vessel to the pier. It is used to attach reins to a bridle, as well as to tie a horse in a stable. If you pass the running end, not folded in half, into the loop of the Kalmyk knot, then the knot will not be a quick-release one. This is how he is. called a Cossack knot. The untied weaving knot (Fig. 9-61) holds securely, but can be untied at any moment, even under tension. Reef node (Fig. 9-62). This one was popular in the past by sea. The knot is known in everyday life as a “knot with one bow.” It is familiar to everyone; many tie their shoelaces with it. This simple and useful knot is very similar to a straight knot and is knitted in the manner shown in Fig. 6-39, except that when tying the second half-knot, its running end is threaded into the loop folded in half. When you pull on the running end, the knot instantly unties. Double reef or halyard knot (Fig. 9-63). Sailors almost never use it: a reef knot is enough for temporary tying. In Vladimir Dahl's dictionary it is called a “loop knot” and “burdock (bow)”. It is often called a byte node. It is knitted in the same way as a straight knot, but in the second half-knot the running ends of the cable are tied folded in half. This is an indispensable knot for tying shoe laces, ropes, bows on the neck and bows in the hair, as well as on packages and boxes. The mill knot (Fig. 9-64) is considered one of the most common among the many clever knots for tying bags. In principle, this is the same figure eight, in the second loop of which the running end folded in half is passed. It is very convenient because it can be tightened tightly and quickly untied by pulling the running end. Bucket knot (Fig. 9-65). Using this “remotely untieable” knot, you can lower an object from a height, for example, a bucket of water or mortar, place it on the ground and raise the rope up again. This original unit can be successfully used by firefighters, builders and climbers. Imagine that a climber needs to descend from a height using a rope. He is walking alone, and he has one rope, which he will still need. The rope needs to be secured with a bucket knot, go down along its root end and, with a jerk on the long running end, untie the knot tied at the top.
 SPECIAL SEA KNOTS Hack knot (Fig. 10-66). When the necessary stopper is not at hand, the load is lifted with a crane or boom on a hook, using a regular steel or plant cable. In this case, they use a hook knot. When there is a load on the main end, the running end of the cable is pressed against the inside of the neck of the hook, and a loop tightened around its back holds both ends - this is the great wisdom of this simple knot. When putting the cable on the hook, you need to carefully ensure that the root end of the cable always passes under the chassis. However, it should be borne in mind that it is possible to lay and safely lift the load with a single hook knot only if the cable is thick enough in relation to the hook. To prevent the hook assembly from becoming poisoned when the load is removed, the running end is grabbed with a temporary grip to the main one. Using the principle of the hook knot, it is possible to lift the bag on the hook without a cable if its neck can be wrapped once around the back of the hook. Hook assembly with hose (Fig. 10-67). A thin cable secured with a single hook knot can slide off the back of the hook. If the cable is thin in relation to the hook, it is laid with a hook assembly with a hose, which greatly increases the reliability of lifting the load. "Cat's Paw" (Fig. 10-68). The name of this knot is justified - it looks like a cat's paw. This knot is used in cases where the sling needs to be attached to the hook in such a way that there is no excess slack. To tie this knot, the loop of the sling is placed on top of its two ends - two small loops are obtained, each of which is simultaneously twisted outward several times, depending on how much the sling needs to be reduced. Then the loops are brought together and put on the hook. The “cat's paw” is not clamped tightly, and the knot is easy to remove from the hook if there is no load on the line. The barrel knot (Fig. 10-69) is used when there is no special sling or device for lifting full open barrels in a vertical position. A half-knot is knitted on the middle part of the cable; the half-loops of the knot are spread apart and cover the middle part of the barrel. The lower part of the loop passes through the center of the bottom of the barrel, the free ends of the cable are tied with a straight knot, and if the cable is already secured at one end, then with a gazebo knot. The barrel unit is used when loading various types of containers that have a cylindrical shape. In everyday life, you can quickly tie it around a can or tank without a handle. Amphora knot (Fig. 10-70). The ancient Greeks came up with this knot; it allowed them to conveniently carry amphoras (universal vessels with pointed bottoms in which olive oil, olives, wine, grain, flour, etc. were stored and transported. ) without the risk of losing their valuable contents. This knot is not simple, it is difficult to knit, in several stages, but with its help you can make an excellent rope handle for carrying a bottle, jug or, in general, any vessel with a small protrusion on the neck. Olympic knot (Fig. 10-71). It was called Olympic because it consists of five rings. This ancient sea knot from the “golden age of sail” sounds very sentimental in English: “Two hearts beating as one.” The purpose of the knot is to temporarily shorten the cable. The Olympic knot is reliable and, despite its apparent cumbersomeness at first glance, is knitted quite simply. Crab loop, or protracted fire (Fig. 10-72). The peculiarity of this knot is that it can work in two qualities: a tightening loop or a non-tightening loop. If the ends of the crab knot at the points marked with the letters A and B are sharply and strongly pulled in different directions, indicated by the arrows, the knot ceases to be tightened. Taking the form shown in the third position from the right in the figure, the knot is no longer tightened, its loop becomes permanent.
 KNOTS FOR FISHING TACKLE Blind knot (Fig. 11-73). If there is a non-tightening loop at the end of the leash, the easiest and most reliable way to attach a fishing hook to it is to thread the end through the eye of the hook and throw it over the hook, forming a blind loop. This method is good for both cotton and thin synthetic fishing lines; it can also be used if the loop is made of soft wire. This knot is convenient for tying sinkers to the fishing line. Fisherman's eight (Fig. 11-74). This is a reliable way to attach fishing line to an eye hook. He gives a full guarantee that the hook will not come undone. Tuna knot (Fig. 11-75). It differs from other knots in that the eye of the hook is wrapped simultaneously with two loops (like a blind loop). Although it is difficult to knit, it is considered the best among all fishing knots designed for synthetic fishing line. Step unit (Fig. 11-76). This knot is the most reliable for attaching fishing line to a hook without an eye. It is somewhat reminiscent of a tightening noose. Leash based on a running knot (Fig. 11-77). The ability to quickly and reliably tie leashes to a fishing line is an important matter for every angler. To tie a transverse leash to a fishing line in this way, tie a running simple knot in the desired place on the fishing line, but do not tighten it completely. At the end of the leash, tie a figure eight and pass its end into the loop of the running knot. After tightening the last knot as shown in Fig. 11-77, you will securely attach the leader to the fishing line. Leash based on a snake knot (Fig. 11-78). This is a more complex, but also more reliable way of tying a transverse leash to a fishing line. Before tightening the snake knot made on the fishing line, insert the end of the leash with a figure eight tied into its middle. When tying a snake knot, both parts will come together and securely clamp the leash in front of the figure eight. Roller assembly (Fig. 11 -79). To tie this knot on the fishing line, you first need to make a simple knot and insert the running end of the leash into it. The latter needs to be secured like a multiple figure eight around the fishing line and the root end of the leash. This type of fastening is quite reliable and uncomplicated.
 DECORATIVE KNOTS In addition to the decorative knots already discussed (oyster, straight, Flemish, flat and head), many other beautiful knots can be used in applied art. After all, strict, symmetrical, and often ornate and very complex in form, knot patterns have long been used to create heraldic signs, coats of arms, emblems, brand names, seals and vignettes. Tailors often used knot patterns for braiding and trimming of ceremonial uniforms and ladies' ball gowns. Many patterns of tied but loose knots are used by lacemakers and embroiderers to finish their products, as well as when weaving macrame. Let's consider knots that, in addition to their practical purpose, can be used in everyday life as decorative knots during various works with cables. Royal knot (Fig. 12-80). In principle, this is a reliable stopper knot, like a figure eight, stevedore, deadeye, etc. Tied on a thick cord, the royal knot is decorative and can be used for tying the ends of cords for curtains, curtains, drapes, etc. Cord knot (Fig. . 12-81). A correctly tied and evenly tightened cord knot looks very impressive on cords for curtains, curtains and drapes. It can be used at the end of the cord to switch an electrical switch. Turkish knot (Fig. 12-82). To tie this knot correctly, you need to be patient. The knot is quite complicated, but it looks beautiful on a thick cable, especially if it is tied twice. Can be used for the already mentioned cords. Three-loop knot (Fig. 12-83). The symmetrical design of this stopper unit used in maritime affairs has long attracted the attention of artists and graphic artists of applied arts. This is a good ornament for various kinds of decorative artistic works. Four-loop knot (Fig. 12-84). The symmetry and certain ornateness of this knot allow it to be classified as decorative knots. It serves artists in choosing patterns for decorative decoration.
 But then the need arises to urgently attach something under water, a suitable carabiner is not at hand - and the fun begins!

 |
Forming a crossed loop |
 |
Turn the loop with your wrist |
 |
We draw the running end around the loaded rope |
 |
We thread the running end into the crossed loop |
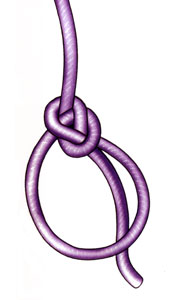 |
Hold the undercarriage and sides of the loop while pulling up on the main end to tighten the knot. Depending on what you need the assembly for, you may need to adjust parts of it before tightening it |
In addition, you can tie bowline with one hand:
 |
 |
 |
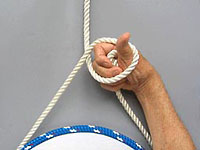 |
 |
 |
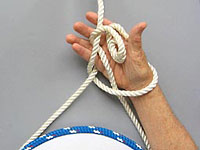 |
 |
 |
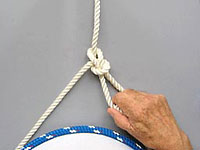 |
 |
 |
Knitting patterns for sea knots - Figure Eight
The figure eight is a sea knot, named because of its shape. Its main advantage is the ease of tying and untying, even on a wet rope.
How to tie a figure eight knot:

- Wrap the running end around the main one, pull it over it, forming a loop
- Thread the running end into the loop
- Tighten firmly
- The node is ready
Knitting patterns for sea knots - Straight knot
One of the simplest knots.
Unfortunately, synthetic ropes can slip under load and are therefore considered unreliable.
How to tie a straight knot: 
Schemes for knitting sea knots - Weaving knot
Similar to straight, but wears less on the rope and is easier to untie.
How to tie a weaver's knot: 
Knitting patterns for sea knots - Half bayonet
Simple half bayonet widely used in maritime affairs and among divers.
It is often used as a finishing knot for other sea knots - it serves as insurance against the unraveling of the main knot.
It makes no sense to tie more than three half-bayonets in a row - the strength of the knot as a whole does not increase with a larger number of half-bayonets.
In everyday life, the knot can be used in cases where the cable needs to be temporarily attached to some object for strong traction, for example, towing a car.
How to tie a knot simple half bayonet:

- We wrap the end of the rope around the attachment point
- Wrap the end of the rope around the main end and thread it through the loop.
- We tighten
- The simple half-bayonet knot is ready!
Knitting patterns for sea knots - Flemish loop
- a strong and easily untied loop at the end of the cable. In diving, it is often tied to fasten items of equipment to a carabiner.
How to tie a knot Flemish loop:
- Fold the end of the cable in half
- Tie a eight-piece on the double part of the cable
- Flemish loop is ready
In conclusion, I would like to remind you that in order to avoid getting into an unpleasant or funny situation underwater, learn to tie sea knots in practice - and regularly refresh your skills!
You can read more about sea knots in the book by L.N. Skryagin